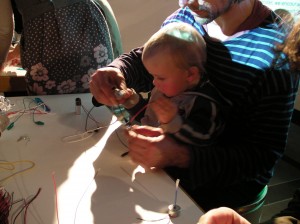
Running a Switch On Switch Off workshop is a great experience for the participants – and the hosts alike!
Here is the complete recipe – don’t hesitate to contact us if you need more informations or want to work with us on your next workshop.
Step One: Build your team
If you have some experience in teaching and hosting a workshop, hosting your own Switch On Switch Off can be a really great experience!
You will roughly need 3 facilitators for a dozen of simultaneous participants. That may seems a lot, but remember that Switch On Switch Off is a quick drop-in workshop. A participant can spend as little as 15 minutes and still get something out of the workshop. He will need dedicated attention during those 15 minutes.
Your facilitators should:
- be familiar with interaction, digital art, dance, design, or any other similar crafts :-)
- understand the basic of electronic circuits
- be used to solder, use hot glue guns, etc
- be super-friendly and creativity oriented
In addition to the facilitators, we suggest that you enroll 1 or 2 persons for documenting the workshop, taking the contacts of participants, and sending them photos of their creation on the spot.
Step Two: Plan your workshop
Decide on the maximum number of simultaneous participants. A good number is between 8 and 12.
Remember that you’ll have much more people participating, because participants stay from 15 minutes to up to 3 hours.
You’ll need a space with a large table and enough chairs for the maximum simultaneous participants planned.
We discourage multiple smaller tables because participants and facilitators will lost more time searching for the tools on other tables.
As Switch On Switch Off is a drop-in workshop, the best place to be located in is an open space with many passers-by.
We started doing the workshop in festivals. (in fact, the drop-in format is an adapation to the pace of festivals)
In Vienna, we took it to an even more open space, and set up the workshop in the courtyard of MuseumQuartier, with great success.
Step Three: Assemble the tools and materials

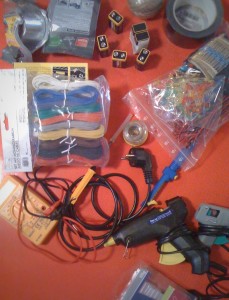
Here is a list of the tools and material the participants needs :
Tools
- 4 Soldering irons — much preferably with stable bases
- 2 Glue guns — useful for example for quickly fixate a weak soldering point.
- Scissors
- Pliers
Consumables
- Soldering thread
- Glue sticks
- Aluminum tape
- Aluminum foil
- scratch / velcro tape
- q tips / cotton swab (we’ll use the stick to connect the motors with other things)
Electronics
- 9v batteries
- resistors 1KOhms
- LEDs
- Small motors (toy motors) – they tend to be the more expensive part locally, so you might want to source them online
- Buzzers 3-20 volts
- Alligator clip wires (allow quick prototyping of circuits)
- Conducive wires
Step Four: Welcome each participant
 Explain the general steps of the workshop: building a simple circuit, replacing the usual switch by body gesture or objects, getting familiar with degree zero of interaction design
- Show them a completed circuit, or alternatively this picture of a very simple circuit taken from the Arduino Booklet
Step Five: Encourage and solve technical problems
- Ask the participants to first build the most basic circuit : a 9 Volt battery plus either a resistor and LED, a motor, or a buzzer
- Then encourage the participant to open the circuit, cutting the flow of electricity — and now use their body, their friends, their belongings and surrounding to act as a switch that close the circuit again.
You should obviously be here to solve the small but blocking technical problems, such as :
- Polarity inversion for LED — just tell participants to try it any way, and reverse the LED if it don’t work! Easier that remembering ;-)
- What is capable of conducing electricity? What is not?
Drive participant to prototype first with the alligator clip wires, the aluminum tape, the glue gun – and when it’s time, suggest to the participant to try and solder for a more definitive connection.
Step Six: Give, document and share :-)
Participants are encouraged to bring back their circuit home. Not everybody will want to, and that’s OK.
Bring a camera at the workshop. Pause a moment to capture the participants working hard on their creations, trying them, having fun. Get their emails before they leave to send them pictures of their work.
And of course, please send us the pictures too!
